
The map
DMZ Hajin guide: deployments, threats and extraction
Hajin is the map DMZ runs on, and the official description of it is a living combat sandbox that changes between deployments. So the map knowledge worth having is not the floor plan — it is how the deployment types work, what the threat levels do, and how the Lieutenant bounty loop actually completes.
Hajin changes between deployments — the floor plan is not the point
The rule that decides every run
Exfiltrate successfully and you keep what you carried out. Fail, and everything in your backpack that is not in a Secure Slot is gone. Every decision on this page is downstream of that sentence.
The three ways to deploy
The official DMZ page lists three kinds of operation, and they want different play.Official
During a three-day window the mix matters: Story Missions give steady progression and teach the map, Dynamic Operations pay better but carry the higher risk of a run that ends badly.
How Hajin is divided
The official DMZ material describes Hajin as a volatile conflict zone left in the wake of war, with the map changing between deployments. Official
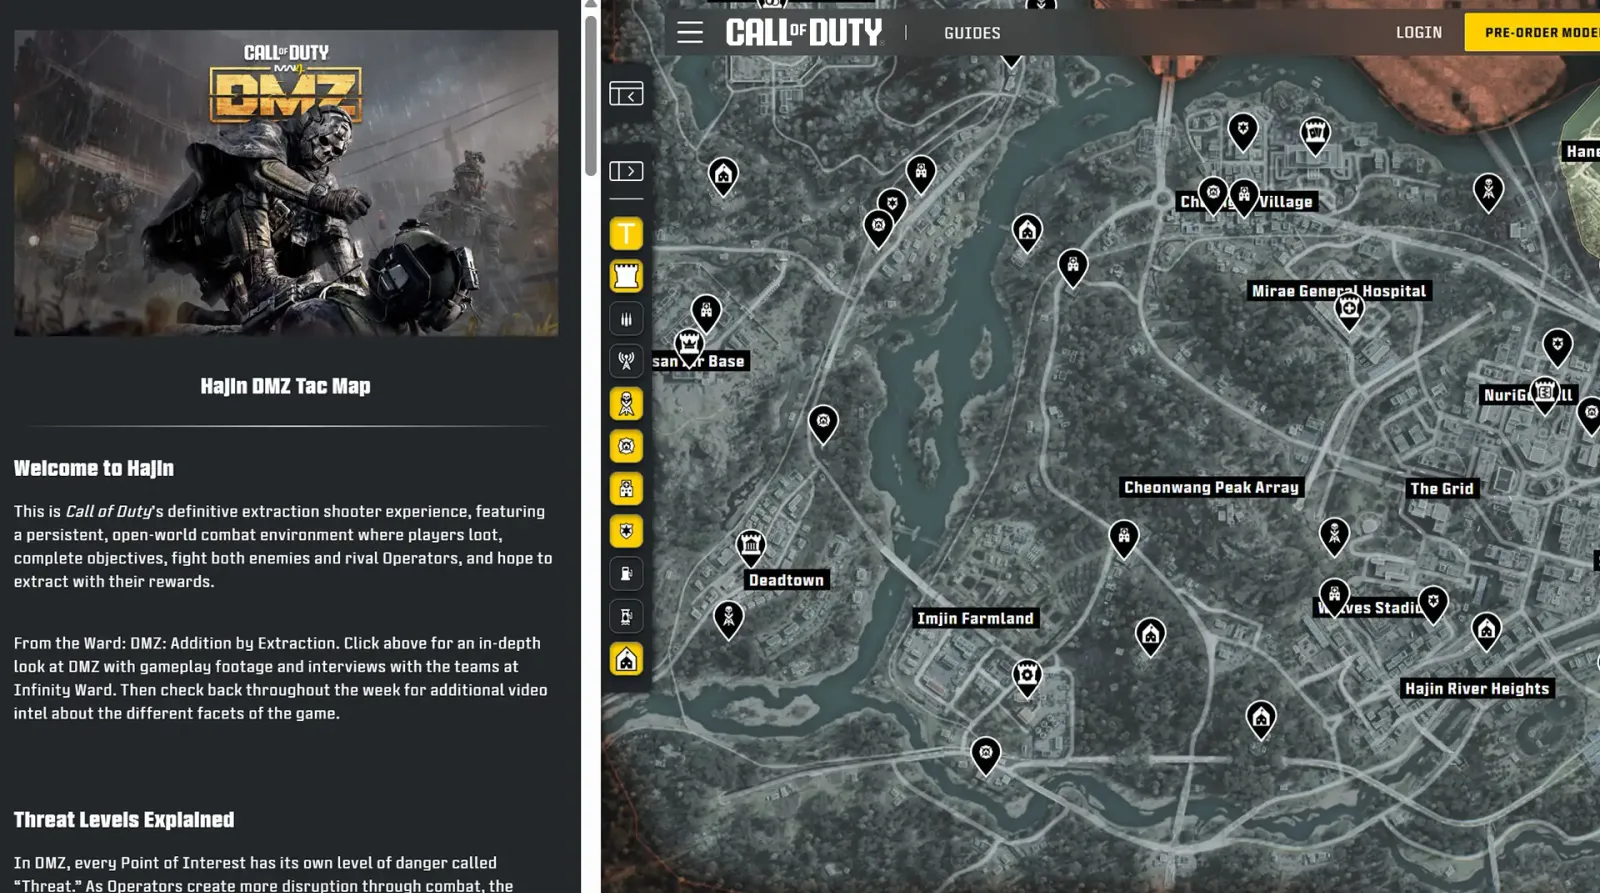
Third-party guides add that the map carries tracked statistics — where players die, where fights happen — and that those numbers shift between deployments.Media report If you plan to run a specific location, check the current numbers rather than trusting a guide written before launch.
Threat levels
Hajin has a threat system: the higher the threat in an area, the more dangerous it is, and enemy units react to the noise and chaos you create.Media report
- Threat scales with the situation. Loud, contested areas escalate; a quiet extraction in a low-threat corner is the cheapest way to bank a run.
- The return trip is where it gets you killed. Guides consistently warn the danger peaks on the way out, when you are loaded and loud.
- Bounties raise the stakes. Taking a Lieutenant contract pulls attention toward you.
Lieutenant bounties and dog tags
The bounty loop is the highest-value activity in DMZ and the one people misread most often.Killing the Lieutenant is only the first step. The dog tag has to be carried back to the base and handed in for the bounty to complete.Media report
- Find the Lieutenant and take the contract.
- Eliminate the target.
- Pick up the dog tag.
- Extract successfully with the tag in your inventory.
- Hand it in at the base to close the bounty.
If you die or fail to extract with the tag, it is lost with everything else and the bounty does not complete. The dog tag storage at the base opens at DMZ level 20, so early in the window it is worth thinking about how you carry a tag before you commit to a fight.
Commanders and the boss board
Above Lieutenants sit Commanders, and both are tracked on the Boss Board at the FOB. The official FOB guide has a station for it — "Boss Board: Lieutenants and Commanders" — and it unlocks once you have completed yoursecond DMZ Order. Official That is a much earlier gate than the Dog Tag Case at level 20, which is worth knowing on day one of the window.
- Lieutenants carry customised weapons and can drop keys to their own named rooms, which often hold that signature weapon. Media report
- Commanders are the top of the food chain. Enemy guides describe a tier ladder running from "Tier 1 North Korean Grunts" up to a named Commander boss. Media report
- Commanders drop prized Ingredients — and killing one and getting out is described as a confirmed way to earn them. Media report Which makes a Commander run both a high-value target and a very loud one.
The Lieutenant bounty loop itself is a five-step job: take the contract, kill the target, pick up the dog tag, extract with it, and hand it in at the base. Missing the last two steps means the bounty does not complete.Media report
The reactor and the radiation zone
The damaged reactor at the centre of Hajin is the feature the official DMZ material describes: a reactor, a prison complex and the city itself, shaped by the aftermath of the campaign.Official
- Radiation gear is a loot category. Third-party item guides point at fire stations as the place to check for radiation gear and parachutes. Media report
- A gas mask is part of the kit. Sources describe radiation exposure inside the reactor area as something you gear against rather than something you ignore.Media report We have not verified the exact protection rules, so treat the thresholds as unconfirmed.
- Radiation storms are described by community databases as a dynamic event that changes where it is safe to be. Media report
A note on scope: this page covers the map and the contracts. The full item rules — what you carry, what you lose and how the containers work — are on the MW4 DMZ gear page.
Getting out
Extraction, secure slots and the run home
- Secure slots protect. Items in a Secure Slot survive a failed extraction. Items in the backpack do not.
- Extraction points are a commitment. Standing in one is a decision to stop gathering and leave.
- Leaving early is valid. During early access especially, banking a clean run beats a greedy one, because you may not get many runs.
The extraction methods themselves — Call Extraction Transport, Fulton balloons, the Exfil Flare and the rest — are covered in full on the MW4 DMZ exfil page.

Vehicles, fuel and gas stations
Vehicles are available in DMZ and they are not free to use. Launch coverage describes them as having a fuel limit and an armour limit, with fuel available at gas stations around the map.Media report
- A vehicle is a shortcut and a louder target — faster across the map, and it draws attention.
- Running dry in the wrong place is worse than walking; plan the route around fuel.
- Vehicle armour is limited, so it is not a substitute for playing carefully.

Where the map intel comes from
Activision published the DMZ intel as two guides: one covering the Hajin environments and threats, one covering the Forward Operating Base in full. Those are the primary sources for everything on this page and theFOB page. We confirmed the structure and contents list of both, but the articles load dynamically on the official blog, so we could not link the article URLs directly — the official DMZ page and the community announcement are the fastest routes to the source.
Hajin guide FAQ
What is Hajin?
What are the three deployment types?
Do I have to extract to complete a Lieutenant bounty?
What happens to my gear if I die?
Sources for this page
- ↗DMZ Deep Dive, Part 1: Tour of Duty – Hajin Environments and Threats, Full Intel Guide — Activision / Infinity WardPrimary source for the Hajin environments, the reactor, the threat levels and the named points of interest. Published October 5, 2026.Checked October 21, 2026.
- ↗DMZ Deep Dive, Part 2: How to Play – Forward Operating Base (FOB) Full Intel Guide — Activision / Infinity WardOfficial source for the Boss Board station and its unlock condition, and for the Lieutenants and Commanders system.Checked October 21, 2026.
- ↗Call of Duty: Modern Warfare 4 — DMZ — Activision / Infinity WardOfficial description of Hajin, the deployment types, the FOB and the trait system.Checked October 21, 2026.
- ↗Steam community — DMZ Early Access deployment to Hajin is live — Call of Duty community teamOfficial intel structure for the Hajin and FOB guides.Checked October 21, 2026.
- ↗Call of Duty: Modern Warfare 4: DMZ Early Access and Bounty Guide — FinalBoss.ioThird-party deployment, threat level and bounty details.Checked October 21, 2026.
- ↗Modern Warfare 4 DMZ (2026): Early Access, Hajin and FOB guide — DORThird-party extraction and Secure Slot rule. The same guide exists in Chinese with a local-time date.Checked October 21, 2026.
Next step